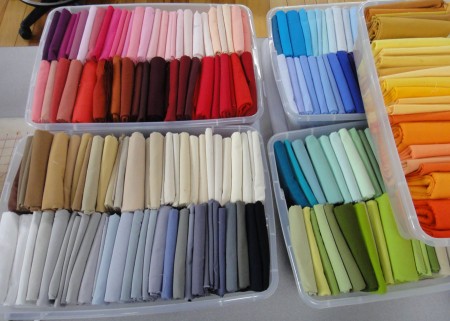
If you ever need to organize lots of fabric to take to a class, here’s one way you could do it based on what I’ve finally figured out after attending three five-day workshops. For a Nancy Crow workshop, for instance, she wants you to bring LOTS of fabric because you need a really wide range of colors and values, and you never know what you’re going to want to use, plus she prefers you bring one-yard pieces of each color so you have plenty on hand. That translates to LOTS and LOTS of fabric that you somehow have to organize and haul. I’m blessed that I could drive to the workshop, so I didn’t have to mail it all in advance. Instead, I actually got to sit in comfort as a passenger while my sweet hubby was my chauffeur and pack mule, but I still wanted everything compact and easy to handle.
I started by waiting for the perfect sale to purchase loads of Kona cotton solids at about $3.50 per yard. That was during last year’s Black Friday sale at Fabric.com. I’m going to watch for it again this year and replenish my supply. Next, I pre-washed everything. Yes, I do pre-wash all of it, especially after I had a bleeding problem years ago with Wedding Dreams and, more recently, with Glorious Gold.
 Once everything is pre-washed, I put in a movie. I fold the fabric with selvage edges together and wrap it around a 6-1/2″ by 24″ ruler. The ruler is slipped out and then the fabric bundle gets folded in half, and in half again. (If that doesn’t make sense, you can see a tutorial with pictures here.) I end up with a nice packet of fabric that is about 6-1/2″ by 5″ or so. I like to use inexpensive, shallow, plastic bins from WalMart. My fabric can be easily organized by color and placed in the bins so just the folds are seen from the top. That makes it a breeze to quickly locate a color, and they slip in and out very easily.
The great thing about this is that once I get home, I can take the fabric out, unfold them once, and put them back right onto my shelves to enjoy and use year round.
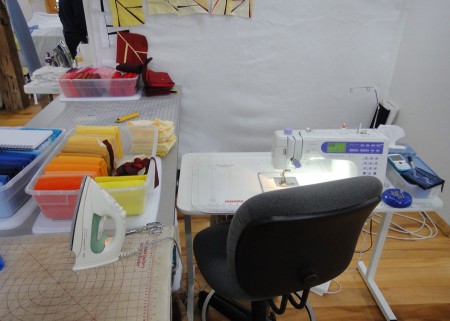
One other thing to consider is how you set up your workspace, whether at home or at a workshop. I use a folding, portable sewing table so my sewing machine is at a comfortable height. If I am going to sew many long hours, I don’t want to hurt my back or shoulders in the process. For this workshop, we were each assigned a space that had a 8 foot by 8 foot design wall and one 8 foot long table.
 Ideally, I want my sewing machine facing my design wall so I can keep looking at my work and keep thinking about what I’ve made and what I need to do next. In this instance, I put my long table perpendicular to the design wall and nestled my sewing table next to that. I placed an ironing station to my left so I could sew a seam and press it immediately without getting up and walking across the room. It would probably have been better if I could have set the iron to my right since I am right handed but this workspace didn’t allow it because of a wall to my right.
When I was doing most of my design work at the wall, I kept my rotary cutting mat closer to the wall, as shown in the picture. Later in the workshop, when I was doing lots of cutting, I moved the mat so I could reach it from my machine without getting up and the iron was next to that. That ended up being a pretty efficient set up when I was cutting and sewing all those short lines during the second exercise.
In the end, I usually try one set up and troubleshoot as the workshop progresses. I like to keep analyzing how things are working and if I can streamline the process to cut down on wasted movement and wasted time. If something isn’t working smoothly, how can I change it? Setting up the quilting workspace isn’t too different from designing an efficient kitchen around the sink / stove / refrigerator triangle. Instead, we have a sewing machine / cutting station / ironing station triangle to consider. Each side of the triangle should be fairly short and easy to get to.
Comments
4 responses to “How to prepare for a week long workshop”
Hi Maria
Do you have any suggestions for bringing a lot of fabric from another country? I live in Australia and will be attending a workshop in Texas in March 2013. Bringing a big fabric stash is NOT an option, and I’d rather not buy even more fabric just for the workshop. I attended a similar workshop this year and brought quite a bit of fabric with me, much of which I didn’t use and had to bring home again. I also bought fabric at the workshop (a local shop sets up for the 5 days and has a good range), but again, I bought things I ended up not using as we did a lot of sharing in class. Of course, I had to schlep it all back to Australia when I was done.
I’m not sure if there’s any solution, but figured I’d ask anyway, in case you’ve had to do this for an overseas or interstate workshop.
–Rhonda
Rhonda,
No, I haven’t had attend a workshop further than a 1-1/2 hour drive from my home. With a Nancy Crow workshop, I do think it is essential to have a wide variety of fabrics to choose from, even though you know you might not use some. However, if I was in your situation, the first thing I might consider is emailing the instructor and explaining the situation. Ask what the bare minimum supplies would be and ask what fabric stores are close by if you need more than you bring.
Or, maybe there is a local student you can pay a certain amount to share her fabric stash. For instance, with what I brought with me, it would have been easy for two or even three cooperative people to share it.
Or, you can make friends with the other students during the workshop, let them all know your situation, and then offer to sell your fabric stash to them at the end of the workshop to lighten your load.
Thanks Maria. Some of the same ladies who attended last March’s workshop are also attending the same workshop as me this coming March. I know a couple of them well enough to ask about sharing stashes, so I’ll look at your second option.
And yes, I will email the instructor too. There is a local store that has a great range, so that’s an option as well, especially as they will also have a mini store set up at the workshop location, which is a couple of miles out of town.
Thanks again
–Rhonda
Great tips Maria. I’m heading back into my studio for a bit of space analysing – see if there is anything I can shift around for better efficiency. (and aren’t all those colours in your boxes glorious?!)