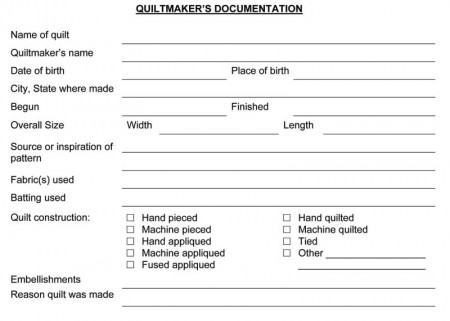
I included a page for a photo of your quilt. I have tons of digital pictures on my computer, but we all know that computers can crash. Besides, technology is always changing. Remember when we were all thrilled with 5-1/4″ floppy disks? Does anyone have a computer that can actually read those things anymore? So unless you are diligent about continually converting digital information to the most current format, I think it’s important to have at least one paper photograph of your quilt.
I also think it’s nice to have fabric swatches. Not only is it interesting to see them all in one place, but it is also useful to monitor any possible fading. I have a quilt that I made in 1991 and I had it hanging in my living room for nearly fifteen years. Even though it was never displayed in direct sunlight, when I compare it with the fabric swatch I saved, I can see that some of the fabrics have faded significantly. Once I saw that, I had to decide if it really matters for this particular quilt. For instance, is it an heirloom-quality quilt? If so, I would want to take immediate steps to protect it. Better yet, I should have been monitoring it all along. For this quilt, however, it’s not that valuable and it’s more important to me that I just enjoy it.
I put 1″ squares on the form for the fabric swatches, mostly because they fit well in the remaining space on the page, but if you have used fewer fabrics, you could attach 2″ squares or whatever size you like. Don’t forget that you can fuse the fabrics onto your paper to make it go even faster.
Get your Quiltmaker’s Documentation form here. I’ve put information about my Lost Quilt Come Home website at the bottom of the form. Please feel free to make copies of this quilt documentation form and distribute it to your friends, your quilt guild, or wherever you like. May your quilt never be among the missing!
Comments
6 responses to “Tutorial: quilt documentation, continued”
Great idea, Maria. From my experience as a quilt conservator, I suggest you add to the Form whether the fabrics have been preshrunk/rinsed or washed before being used.
I also recommend that you attach the fabric swatches with a thread tack instead of using glue, fuse tissue or staples as a thread tack will survive over time without staining or damaging the fabric swatches.
Margaret Geiss-Mooney
Textile/Costume Conservator
Great ideas, Margaret! I’ve been playing with the form for the last hour or so. I’ll post an updated version tomorrow.
Thank you so much for posting this — great idea!!! I have a little photo album of all my quilts but nothing that tells about them. This is perfect!
Mary in Panama
Thank you for sharing this great idea and the form in pdf format. I’ve saved a copy and plan to use it for my quilts. I would never have thought to include all the information you put on your form. I know it took some thought and time to do this and you are a very nice person to share this with all of us. Thanks again.
Happy to help!
Thank you for creating this form. I like the idea of have a running documentation even on things I have given away.