 I am not a professional photographer, but I am convinced that just about anyone can take decent pictures of their own quilts; certainly good enough for documenting your quilts. In most cases, you can take pictures good enough to enter quilt competitions. Personally, I’ve actually only hired a local professional photographer once, and I was disappointed with his results. That said, I have sent a couple of my quilts to quilt magazines for publication and their photographer did an absolutely fabulous job, one I would never be able to reproduce. So, there is certainly a time and place for the professional, but today I’d like to share a few tips you can use in your own home to take reasonably good photos of your own quilts.
- Find a good place to hang your quilt so there are no distractions. Most of my quilts are fairly small, so I use my portable design wall as a photo backdrop. My design wall is simply a piece of 4 ft by 8 ft by 1″ thick foam insulation board purchased from my local big-box building supply store. I pinned a piece of black fabric to one side and a piece of white fabric to the other. I drag this design wall all over the house, wherever I need it at the moment. It works great for photography! I can prop it up against a wall inside or out. When a quilt is too large for my design wall, then we move some furniture so I have a blank wall to use as a backdrop. If most of the quilts you make are large, you might consider having two design walls that you can place side by side.
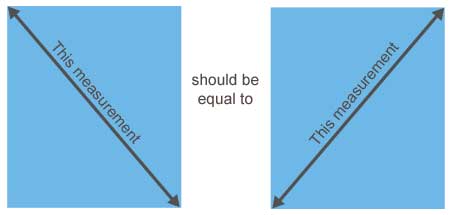
- Pin your quilt carefully. I use pins with very small heads and I place them along seams so they don’t show. I take time to carefully pin my quilt so all the edges are straight and the quilt is square. I can lay my design wall flat on the floor to make this easier. Once I have the corners pinned, I can measure from the top left corner to the lower right corner and make note of that measurement. Then I measure from the bottom left corner to the top right corner and compare that measurement with the first. If I’ve pinned my quilt so it is square, those two measurements will be the same. Then I’ll lay a yardstick along the sides of my quilt and pull them until all the edges are nice and straight.
- Use a tripod. One of the best tips I can give you is to always use a tripod! This will help ensure a nice, crisp photo. This last time, I even used the 2 second time delay feature on my camera so it would be absolutely still when the shutter clicked.
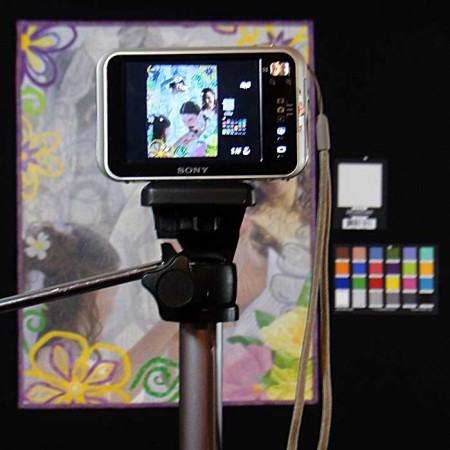
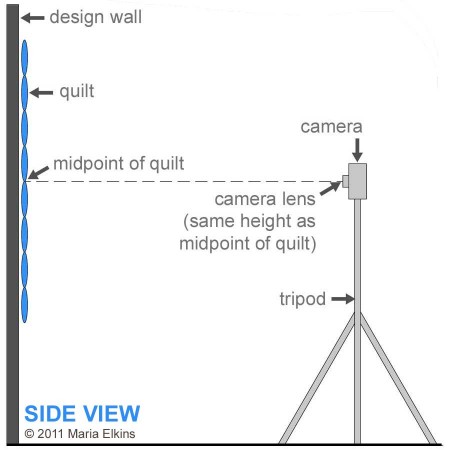
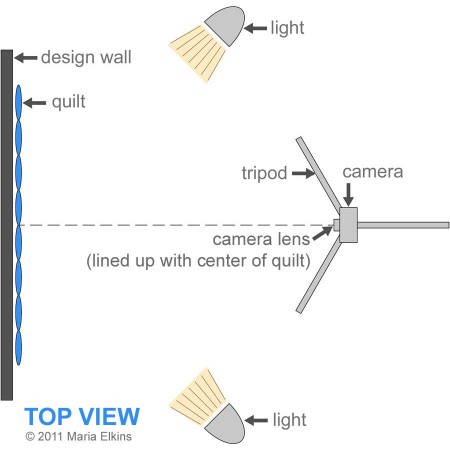
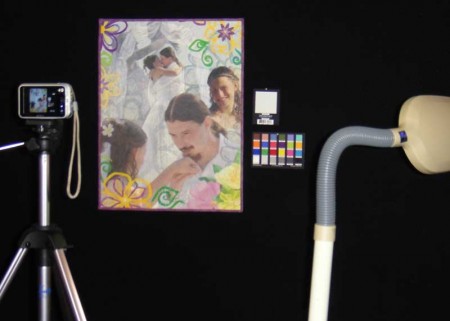
- Position your camera correctly. To minimize distortions, adjust your tripod so your camera lens is pointed at the middle of your quilt. If you need to, use a tape measure. Check the distance from the middle of your quilt to the floor and then move your camera so the center of the lense is at the same height. Next, adjust your camera so it is parallel to the design wall. When your camera is not parallel, you get wonky photos. I take quite a bit of time looking at the view screen of my digital camera to see if the edges of my quilt are parallel with the edges of the view screen. (See photo at top of post.)
- Use extra light. I like to take pictures outside on an overcast day when possible, but the weather doesn’t always cooperate. In those times, I use my living room. I have two floor lamps which have full-spectrum light bulbs. I drag them in and use them for extra lighting. For even lighting without completely washing out the quilts, I place them so they are at 45 degree angles (or less) to the quilt. Sometimes I’ll place one lamp on either side of the quilt. I can usually get the best coloring that way. After a few shots like that, I’ll either turn off one light or place both on the same side. That way I can create shadows and I can usually get a good shot of the quilting. Also experiment with moving your lighting closer or further away to see what shows off your quilt best.
- I tried something new this last photo shoot. I positioned an inexpensive color card from CameraTrax next to my quilts. You can see it on the right in the photo above. If I understand correctly, this card is a “known” reference that would help a publisher to digitally correct a photo so the colors are right.
- Take lots of pictures. I usually take ten or more pictures of each quilt. I keep changing the lighting, I zoom in different amounts, I take full shots and detail shots. My aim is to give myself many options so there is a greater potential that at least one is really good.
- Check your pictures. If you’re smart, you’ll transfer your digital pictures to your computer and look at them closely before taking down your quilt. Ask me how I know! Make sure you have the entire quilt in the picture. Make sure the color is a reasonable representation of the quilt. Make sure they are clear. In short, make sure you have all the pictures you’ll want of this quilt if you never had the opportunity to take any more.
I hope a few of these pointers might help you take better pictures of your quilts, even if those pictures are just for your documentation.
Comments
8 responses to “Tutorial: Photographing quilts”
Thank you so much for sharing this, Maria. I’ve just really started taking more photos of my quilts and have been encountering a number of problems. I think your post jst helped me solve a number of them. Thanks so much!
Thanks Maria,
The color card is a good tip and so is measuring from the bottom to find the centre of the quilt.
Great tips! Thank you so much.
Wonderful tips! As a quasi-professional photographer myself, I think you covered just about everything! One thing I learned, taking my items outdoors to shoot against a white backdrop: there’s a reason they suggest “bright overcast” as the perfect outdoor lighting… I took some in “open shade” on a sunny day – and then wondered why my images were so bluish. Finally realized it was my white backdrop reflecting the bright blue sky outside the shady area! A lovely gray sky is better, in this case. : )
Also, I love your diagrams of everything – especially your BLUE quilt with its “quilting”!! : )
Thank you so much. I appreciate all of the time and expertise you are sharing. I never thought about extra lights. That makes a lot of sense. It is so very wonderful of you to help us all.
New to your blog, but I’ve been following your website for some time. I am not a photographer at all, but I love taking pictures. Sooo, this nice tutorial is wonderful for me. Taking pictures of my quilts and those for our quilting group has always been sort of challenging for me. This helps me consider and reconsider what I do without a lot of technical jargon that just befuddles me. LOL. Thanks again and many thanks for the links to contemporary quilting artists.
Thanks, Maria. I needed all of the wonderful instructions to take better photos. I had one or possibly two quilt photos that were not accepted because of the photography. I appreciate the time that you took to share this with us.
Thanks
Diana Bracy
This is a wonderful tutorial!! Thanks so much. I have recently started a blog for my patterns and my photos definitely need improvement! I am excited to try your tips!