 Yesterday I started drafting a new quilt. I use the term “drafting” because this grid method is a systematic way of enlarging a photo to the size that my quilt will be. This is a pretty low-tech approach that anyone can use. It doesn’t require any special equipment. Just a ruler and pen and a big piece of paper, or in my case, several pieces taped together. I get easel pads from Quill.com. Each piece of paper is 27″ by 34″. I get the ones that have a 1″ grid of light blue lines. In my opinion, this paper is perfect for designing quilts.
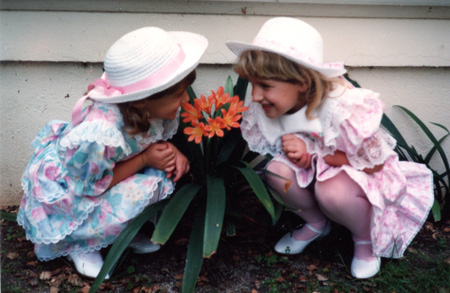
I start with my photo. I remembered this particular picture as being a favorite, so I went to the photo albums. I was surprised, it was not there. I checked my computer and my external hard drive to find it. Not there either. I vaguely remembered a stack of photos somewhere…but where? A couple of frustrating hours later, after searching several places, I finally found it! This picture is so old, at least a decade before we owned a digital camera, and the negatives were lost long ago. I was thrilled to find it, and the first thing I did was scan it into my computer. Now it is safely filed away where I can find it again! Of course, if all goes well, I’ll have a quilt of the photo, so I won’t need the photo again. Interesting how that works…
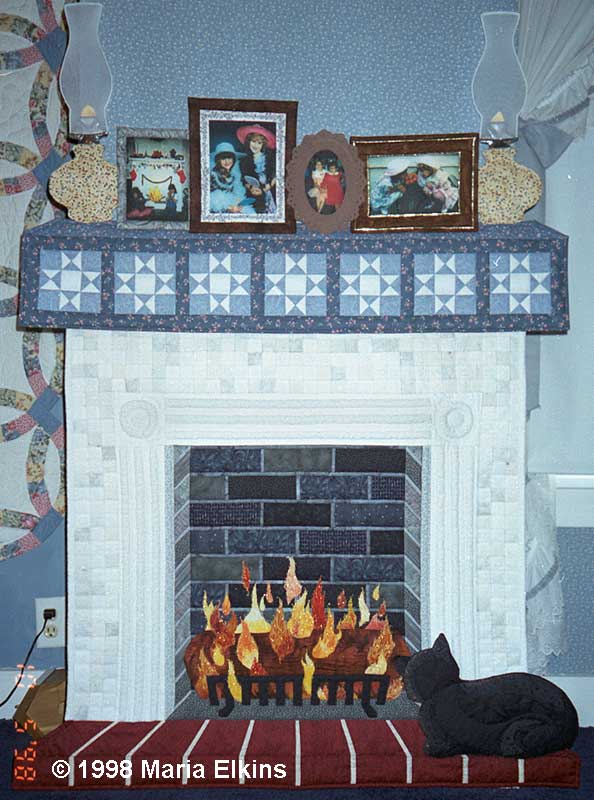 Later, I had to laugh. How could I remember a picture that has obviously been in hiding for so long? It’s because it is on the “mantle” of my quilt, First December in Ohio! It’s the last picture on the right, next to the hurricane lamp.
Once my photo is scanned into the computer, I print it on regular paper. I usually print it out to fit the paper so it is bigger. Then I draw a grid on it.
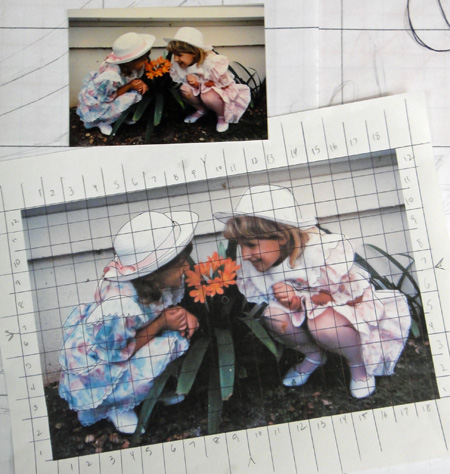
There’s probably an easy way to use Photoshop Elements to draw a grid that will print. If you know how, let me know! I couldn’t figure it out, and I didn’t want to waste any more time searching out the answer. It was faster to draw the 1/2″ grid myself using a pen.
The next step is to draw a corresponding grid of equal ratio on my large paper. My original photo had 18 by 11 squares, so my large paper needs to have the same. It helps that it already has a 1″ grid. Based on the size I want my quilt to be, I darkened every third line to create a secondary grid on top.
Using my picture with the grid as a guide, I drew the two figures on my large paper. It’s as easy as going square by square and drawing the lines that are in that square. I could have drawn the entire thing freehand without the grid, but I would have spent more time fiddling with proportions. With this technique, I get the proportions established correctly from the start, and I can tweak things from there. It also gives me the opportunity to become really familiar with the shapes.
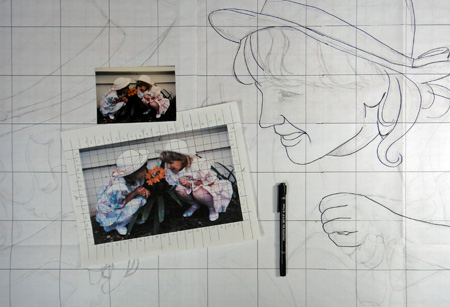 Once I like my pencil drawings, I darken the lines I want with a marker. I want those lines to be dark enough that I can lay my fabric over the top and see the lines without the use of a light box.
But before I transfer it to fabric, I pin it to my wall and look at it a while. I already know there are areas I need to revise before transferring the drawing. I’ll try to do that later today.
By the way, does anyone know what kind of flower is in the picture? The only thing that grows in my garden are blue bottles, so I don’t have a clue.
Comments
6 responses to “Drafting a portrait quilt”
The flower looks to me like a Clivia. At least that is the common name for that flower/plant here in Australia. My mum has many in her garden. Thanks for your blog, I appreciate the time and detail you put into the posts.
Thanks, Catherine! It is a flower that my mother-in-law grew in her front garden bed about 20 years ago. I looked up Clivia on Google Images, and I do think that must be the right one.
Definitely orange clivia. It grows well in our Southern California gardens.
Thanks, Sally!
You can create a grid by defining it as a pattern. Then create a layer on top of the photo & do a pattern fill. Here’s a link I found that is detailed:
http://www.tutsforps.com/Photoshop-Tutorials/Photo-processing/Create-a-printable-grid.htm
Thanks, Rebecca! I’ll have to give that a try!